API Onboarding Playbook
While the YubiKey as a Service Delivery service can be run entirely through the Customer Portal, it also comes with an API that provides the ability to extend the functionality to custom applications. The YubiEnterprise API is available for developers associated with customer organizations to integrate custom solutions that meet specific business requirements. The API calls are free of charge.
The following sections describe the steps to get up and running and start working with the YubiEnterprise API to integrate with various platforms and solutions to deliver YubiKeys to end users.
API Caller Account Setup
Here you will set up a sub-account for the application that will be calling the YubiEnterprise API, and generate an API token for authentication. Creating the account and the API token is done in the Customer Portal. For access to the Customer Portal for your organization, see Onboarding.
Prerequisites
- An email account for the application that will be calling the API. Ensure you have access to this email account since the Customer Portal login instructions will automatically be sent to this email address.
- Access to the Customer Portal for your organization.
- Customer Portal account with Console Owner permission to be able to add user accounts for your organization.
Note
If your organization has Single sign-on (SSO) enabled, new users do not have to register. Users are immediately added to the organization in the Active state and can use the SSO service-provider-initiated login link to log in to the Customer Portal. For more information, see Authenticating with SSO.
Creating an Account
To create a user account with an API token for the API caller, do the following:
In the Customer Portal, create an account only to be used by the API caller, for example “my-app@example.com”. For instructions, see Creating and Removing Users.
Assign the Console Admin role to the API caller’s account.
Activate the new API caller account by clicking the login link in the email sent by the system, and follow the instructions to log in.
Note
If your organization is using the single sign-on (SSO) method, you cannot change your password or your authentication method when you log in via SSO. You must use your credentials (username, password and YubiKey) to log in. Only then can you manage your credentials.
Associate a YubiKey for the API caller user account with the Customer Portal login credentials:
- On the upper right of any Customer Portal page, click the user icon of the API caller and select Manage credentials to open the Account page.
- Register at least one YubiKey (WebAuthn credential), for instructions see Managing Login Credentials. It is strongly recommended to register a second YubiKey in case the first one is lost.
Generate an API token for the API caller account as described in Creating API Tokens. Make a copy of the API token and store it in a secure location for future usage.
Creating API Tokens
The following section describes how to create and manage API tokens used by API callers for authentication. An API token is tied to an account and an organization.
To create an API token for an account, do the following:
In the Customer Portal, click the organization name on the top of the left menu and select Manage API token. In the token dialog that appears, click Create API token.
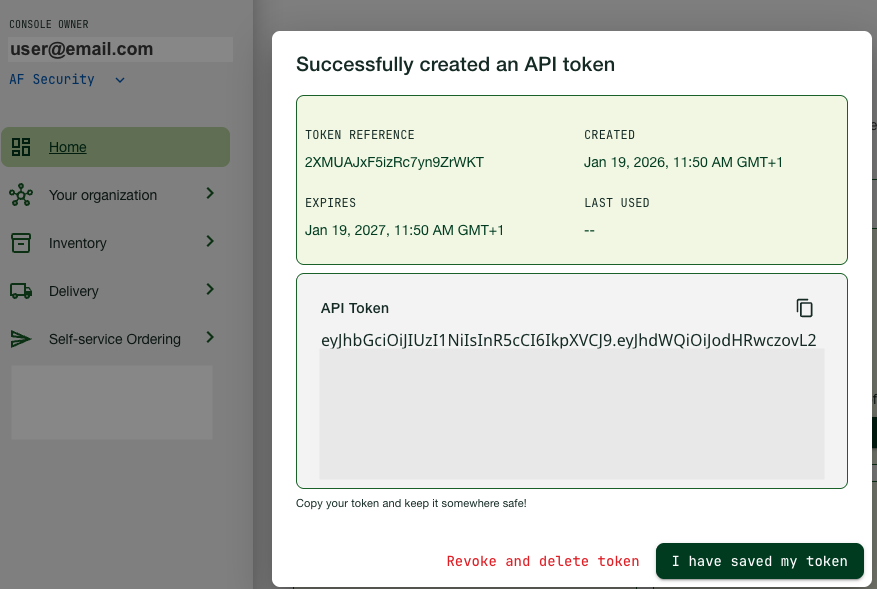
Click the Copy icon to make a copy of the token and store it in a secure location. The token is shown only at this time, if you navigate away from the dialog you will no longer be able to view it.
Click I have saved my token to close the dialog.
Notification of API Token Expiry
API tokens expire one year after generation. Since a user (API caller) can have only one API token at a time, you must have a plan to roll-over to a new API token before the old one expires.
The system automatically emails notification that the API token will expire:
- 7 days beforehand
- 1 day beforehand
- On the day of expiry
The notification is emailed to:
- The user (holder) of the API token
- The Console Owner (account owner, in cc)
For more information about user roles, see Roles and Permissions.
Note
API tokens are only valid for one year at the time. Creating a new API token can be done at any time, and the generation of a new token will invalidate the old one. Tokens are bound to a user within an organization. If an application is using an API token created by user A, then user B generating a new API token will not revoke the token created by user A.
Revoking and Deleting API Tokens
An account can have 0 or 1 API access (machine) tokens. Once you have a token, it must be revoked and deleted before you can get a new one - even if the old one has expired.
- From the API:
You can add logic to renew the token by calling the API to get a new token before the existing one expires. The
GET /auth/machine-tokenrequest revokes any existing tokens and creates a new machine token. Note that this could cause outages sinceGETin this instance is not a safe idempotent operation. - From the Customer Portal: While logged in to the Customer Portal as the user with the relevant API token, click the organization name and select Manage API token. Click Revoke and delete active API token. Once you revoke and delete the old token, the option to create a new token appears.
Organizations and API Tokens
API tokens are scoped to organizations. In the case of a multinational organization shipping YubiKeys to both Europe and United States/Canada, two separate organizations will be set up. In this case, two API tokens are required, one for the European organization, and one for the US/CAN organization.
An individual user can have one role in one organization and the same or a different role in another organization. Even if the same individual is the Console Owner for both, there is a separate account for each. For example a user could be a Console Owner in a company’s US/CAN organization and a Customer Portal Admin in the same company’s EU organization. However, because these are separate organizations, if the user is logged in to the US/CAN Customer Portal, the same user cannot use that login to perform operations in the company’s EU Customer Portal.
The following is important regarding API tokens:
- Protect access to the API token, because whoever is in possession of the token is authorized to perform API operations for your organization.
- Accounts that use API tokens should have the Admin role, not the Owner role. This reduces the risk if the token is compromised, since the token has only the permissions associated with its role.
- If a user is removed from an organization and has a token in that organization, the token is revoked. If a user is suspended, all tokens are revoked. The tokens are left untouched if the user is reset or the password is reset.
Authenticating with HTTP
The YubiEnterprise API supports the HTTP Bearer Authentication scheme. In order to authenticate with HTTP, you must provide the API token in the header of the request. For instructions on how to create an API token, see Creating API Tokens.
To use the API token, copy the token from its secure location and paste it into for example a curl command in a bash script as shown below.
curl "https://api.console.yubico.com/v1/inventory" \
--header "Authorization: Bearer eyJhbGciOiJIUzI1NiIsInR5cCI6IkpXVCJ9..."
Working with the API
Consider the points in the following before you begin working with the API.
- Shipment flow
- Make sure you understand the shipment request “happy path” flow and how to handle any error cases. For more information, see Delivery Concepts and Best Practices and Troubleshooting.
- Customizations
- YubiKey as a Service includes the possibility to custom program and pre-register YubiKeys. To learn more, see Customizations and Shipping Pre-registered Keys.
- Data model
- The API exposes the YubiKey as a Service data model. It is crucial to understand the difference between product and inventory identifiers. For more information, see Product and Inventory Identifiers.
- Low inventory
- Prepare for initial stock running out by setting up pulling from the buffer or replacement stocks. Set up notification to admins of low inventory and automatically roll shipment requests to buffer and replacement stocks.
- Testing
- Use an isolated sandbox environment to reduce testing time.
- API updates
- The YubiEnterprise APIs occasionally have breaking changes. Therefore, monitor releases and spin up a project to prepare for migration before the change goes live. To get notified about API changes, see Release Notes and sign up for the Yubico Developer Program mailing list.
The following section provides a starting point and an introduction to the YubiEnterprise API. For full API details, see the YubiEnterprise API Reference.
Shipments
Shipping to a single address: Use the
/shipments_exactAPI to ship products to a single address. This API can be used to handle shipment requests both directly from Yubico, or through resellers (channel partners).For more information about the API, see Create a new shipment.
Note
Shipping to multiple addresses can only be done from the Customer Portal. For more information, see Shipping to Multiple Addresses.
Listing shipment requests:
GET /shipments_exactretrieves a list of all shipments.In cases where there are more than 100 shipments, iterate through the shipments based on the number of shipments provided by the
total_countparameter. Use the optional parameters to obtain more records. For example:// get the first 100 /shipments_exact?limit=100&offset=0 // get the second 100 /shipments_exact?limit=100&offset=100 // get the third 100 /shipments_exact?limit=100&offset=200
For more information about the API, see List all shipments.
Searching shipments: The
/shipments_exact/search-descriptionroute provides a description of the searchable fields on searchable resources. Returns a metadata object that describes which fields onGET /shipments_exactare searchable/sortable.For more information about the API, see List searchable fields.
Tracking shipments: A successful response from the
shipments_exactresource includes ashipment_idwhich can be used withGET /shipments_exact/{shipmentId}to get the tracking information for a specific shipment request. The response includes atracking_numberand atracking_linkfor the shipment.For more information about the API, see Get a shipments by its ID.
Products
Identifying products: The
product_idparameter used withshipments_exactprovides the unique identifier for a product in a shipment request. For example “4” represents a YubiKey 5C Nano. For input values, see Product and Inventory Identifiers.For more information about the API, see List products.
Inventory
Identifying inventories:
inventory_product_idspecifies which inventory you are drawing from in a shipment request, for example “Base” or “Advanced” tier, relating to the different types of purchasing options. For input values, see Product and Inventory Identifiers.inventory_typerelates to the type of purchase such as “subscription” or “”non-subscription”, see Subscription Inventories. For input values, see Product Inventory Type Mapping.For more information about the API, see inventory.
Verifying inventory: Before creating a shipment request, you can verify that all the products you intend to ship are currently available in your inventory to avoid shipping errors caused by lack of inventory. To get a complete list of products and inventories available to your organization, make a call to
GET /inventory.For more information about the API, see inventory.
Viewing inventory allocations: On certain occasions, shippable quantities for a product might be allocated by Yubico, for example due to limited availability, see Shippable Inventory. To view inventory allocations, make a call to
GET /inventory-allocations. The response includes an entry for each product with theremaining_allocated_inventoryvalue representing the amount of keys left which can be shipped.For more information about the API, see inventory allocations.
For more API information, see the YubiEnterprise API Reference.
Integrations
For an organization that has fully integrated the Delivery service into its own internal systems via the APIs, the fulfillment experience is streamlined. The end user receives an email notifying them that they are eligible for a YubiKey and/or that they are required to use the key for specific system access.
The email directs the end user to the corporate fulfillment system, for example ServiceNow. The YubiKey can be pre-registered and shipped directly to a specific end user who received a randomly generated PIN code separately.
For shipping delivery integration examples, see ServiceNow Integrations and Shipping Pre-registered Keys.
Self-service Developer Project
The YED Self-service Developer Project lets you create a web portal driven by the YubiEnterprise API that allows your customers to order from your organization’s inventory. The example in this GitHub repository demonstrates an end-to-end solution with the ability to integrate the YubiEnterprise API into a web application that users in your enterprise (or beyond) could use to create YubiKey shipment requests drawing on your organization’s inventory.
In this project you will:
- Stand up an environment in Amazon Web Services (AWS) to handle the server-side operations for the YubiEnterprise API and for handling user authentication/authorization
- Use the YubiEnterprise API to create, delete, edit, and retrieve shipment requests as well as verify a shipment address
- Create a front-end application for your end users to request shipment of a YubiKey that has been defaulted by your organization.
Note
The project demonstrates a reference architecture showing how you can deploy your own YubiKey ordering portal using the YubiEnterprise API. The application should not be considered “production ready”, and does not implement the FIDO2 Pre-Registration Shipments API.
Below are a few considerations to ensure the success of your integration.
- Policies to prevent abuse: This demo will allow a user to request shipment of as many keys as they desire. Additional logic will need to be built in to limit the number of shipment requests based on your requirements.
- Selectable security Key: This demo is configured to order the YubiKey 5 NFC, and can be extended a variety of ways to allow different keys.
- Error handling: There is one section in this guide that describes handling methods if an error is sent during the initial order. For a production deployment, there are a variety of different error cases that should be considered such as low inventory, shipment failure, undeliverable address, etc.
- Auto-filling address: Currently this guide assumes that the user will be shipping their key to the address listed in ServiceNow. The catalog item may need to be extended to allow the user to input their personal address (for example, if they are not located at one of your main offices). You may want to consider leveraging the YubiEnterprise Delivery Verify Address API to allow your users to correct any address errors prior to submitting a shipment request.
- Configuration based on your security requirements: This includes swapping the system out to use your identity provider, secrets management in AWS Lambda, and other controls used by your organization.
- People and process impacts to customer service: If your application is intended for external end users then your internal CX team needs to be prepared to handle inquiries relating to the Delivery service/YubiKey. Either an internal team should be established and trained to handle these items OR you can engage Yubico Professional Services.
- Multi-region PO support: The current demo is configured for a purchase order covering a single region. You need to use the proper API token for the user’s region. For example, North America/Canada is one region, EMEA is a different region and each have their own associated API token.