User Management
The following section describes the authentication concept for the YubiEnterprise Console, and how to manage Console user accounts and permissions.
The initial Console Owner (organization account owner) for an organization using YubiEnterprise Services is set up by Yubico during onboarding. The Console owner then sets up additional Console users for the organization.
Each user in an organization has a single account, the username for which is their email address. New users receive an email with an activation link through which they complete the setup of their account by registering a YubiKey. For more details, see Activating User Accounts.
In the case of an international organization shipping YubiKeys to multiple countries, separate organization accounts can be set up. The same individual can be the Console Owner for multiple organizations.
Important
Ensure your organization has at least two Console Owners. That is the only role that can perform password and account resets for users who have been locked out. If your organization only has one Console Owner and that person locks themselves out or leaves the organization, you must contact Yubico to set up a new Console Owner which might delay your shipments.
Viewing Users
In the Console, click Settings > Users to open the Users page. What you see here depends on your role. You can only access user information through the Customer view with either the Console Owner, Console Admin, or Console Auditor role. Only Console Owners can edit or delete users, Admins and Auditors can only view the user information.
For distributor and reseller types of organizations, there are also Distributor and Reseller roles that control permissions for these users. For more information, see Roles and Permissions.
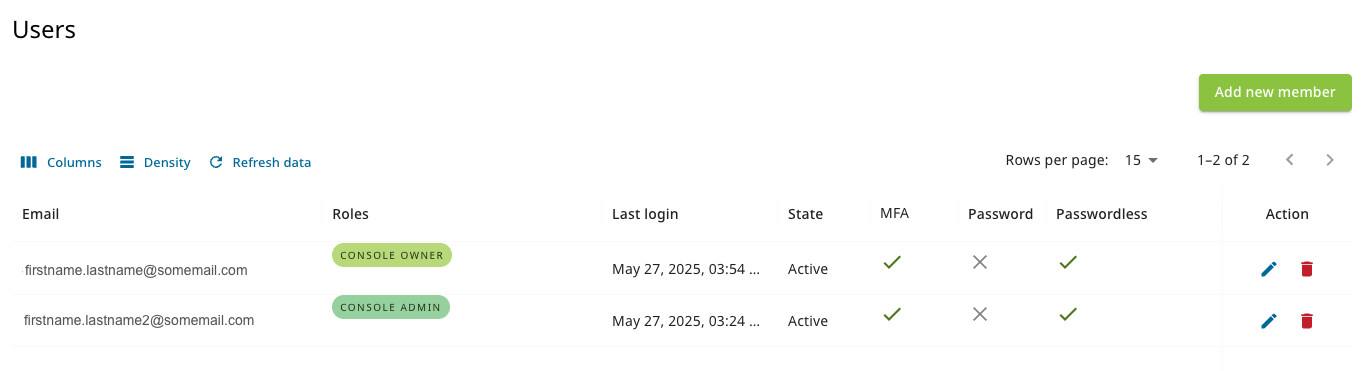
Customer/Console Owner view of Users
The following information is displayed:
- Email - Email address used to log in to the Console.
- Roles - The role that the user has in the system, see Roles and Permissions.
- Last login - Date and time when the user was last logged in.
- State - The state of the user’s account, for example “Pending” or “Active”, see User Account States.
- MFA - Indicates whether the user has enabled multi-factor authentication (tick) or not (x).
- Password - Indicates whether the user has set a password (tick) or not (x).
- Passwordless - Indicates whether the user account has been upgraded to passwordless authentication (tick) or not (x). If ticked, the user has at least one registered passkey, and any previous passwords have been removed. See Passwordless Authentication.
- Actions - Icons for editing or deleting users, only available for Console Owners.
Adding or Deleting Users
Note
Adding or deleting users can only be done from the Customer view by a Console Owner.
Do the following to add a user:
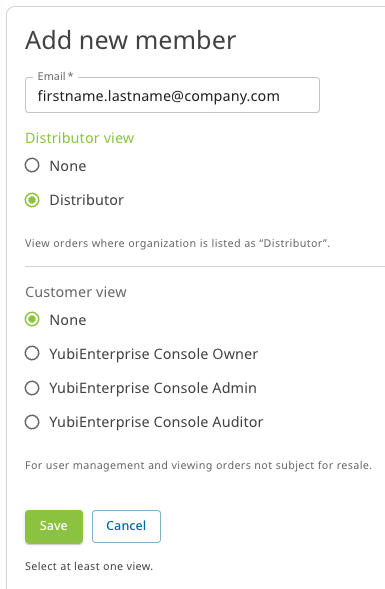
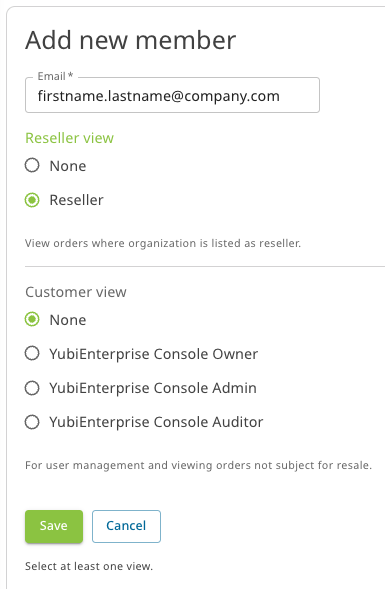
- On the Settings > Users page, click Add new member. The Add new member dialog appears.
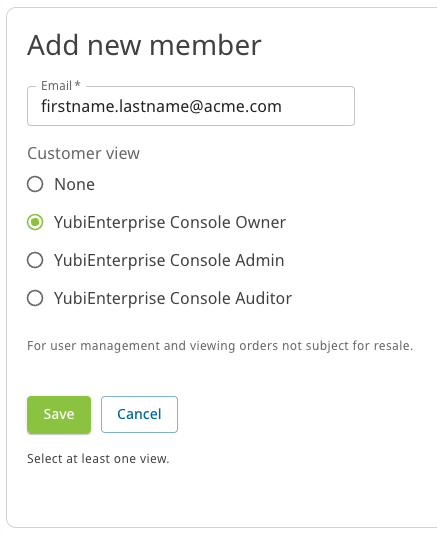
- Enter the new user’s email address and select a role - YubiEnterprise Console Owner, Admin, or Auditor. If your organization is a distributor or reseller you will also have options to assign Distributor or Reseller roles to your users. For more information, see Distributor Role and Reseller Role.
- Click Save. For each new user, the system generates an activation email inviting the user to activate their account.
Do the following to delete a user:
- On the Settings > Users page, click the trashcan icon on the line for the user you want to delete.
- Click Remove user in the confirmation dialog that appears.
Managing Your Account
With passwordless authentication you log in to the Console using a secure proof of identity through a passkey on a registered device such as a YubiKey. For more information, see Passwordless Authentication.
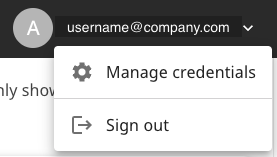
To manage your account settings, click on your user icon in the upper right corner and select Manage credentials to open the Account page. From here you can manage the passkeys associated with your account, as described in the following.
Managing Login Credentials
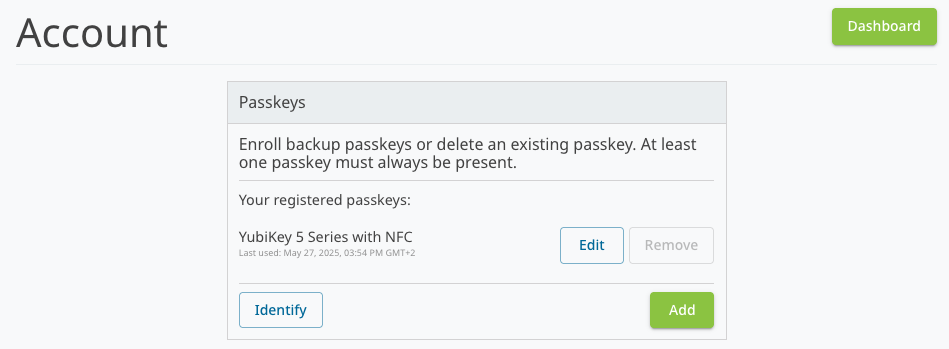
From the Passkeys section in the Account page you can manage passkeys as follows:
- To register a passkey, click Add and follow the instructions in the dialog that appears. Registered passkeys will appear in the list of passkeys.
- To change the name of a passkey in the list, click Edit, make your changes, and click Save. The YubiKey model is automatically provided as passkey name. This can be changed to a name of your choice.
- To remove a passkey from your account, click Remove.
- To check which passkey you are currently logged in with, click Identify and follow the instructions. The current passkey will be highlighted in the list.
Note
For enhanced security, authentication to the Console through password is being deprecated, and organizations are encouraged to move their user accounts to passwordless login, see Upgrading to Passwordless. If you are still using a password to log in to the Console, the password management option in the Account page will be displayed.
Switching Organizations
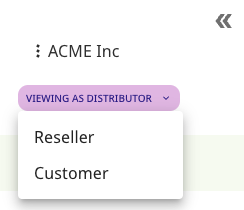
If your Console account is a member of more than one organization, you can switch between the organizations from the more options menu in the top left corner. Click the organization name to open the menu, then select the name of the desired organization to open the dashboard for that organization.
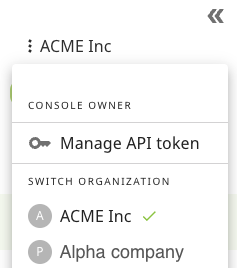
Managing API Tokens
An API token is used by an API caller account for authentication with the YubiEnterprise API, for applications that integrate for example with the YubiEnterprise Delivery service. The API caller account is associated with an organization, and is set up as a Console user account with the Console Admin role. For more information, see API Caller Account Setup.
Passwordless Authentication
Passwordless authentication is more secure and convenient than using passwords when logging in to websites and applications. With passwordless authentication you log in using for example a username or email address together with a secure proof of identity through a passkey on a registered device such as a YubiKey. The passkey is a digital credential tied to your user account and the website or application you are logging in to.
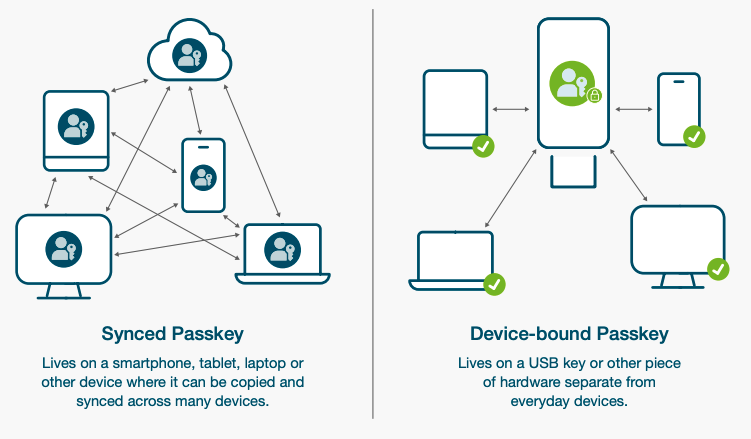
The passkey can be stored on separate external hardware like a YubiKey (device-bound passkey). A passkey can also be stored on multiple devices like a computer or mobile phone where it can be copied and synchronized between the devices (cloud-based synced passkeys).
Synced passkeys can be synchronized between for example browsers (Chrome, Edge, Safari), password managers (1Password etc.), and platform ecosystems (Apple Keychain, Google Account sync etc.). These passkeys are stored in software and can be accessed from multiple devices once synchronized.
A passkey stored on a YubiKey can be used on multiple instances to log in to websites and applications. However, the YubiKey must be registered on each instance before it can be used.
Using a device-bound passkey is the most phishing-resistant option as this requires physical possession of the YubiKey for authentication. Device-bound passkeys cannot be synchronized across devices, and provide enhanced security through hardware-backed cryptography.
For enhanced security, the YubiEnterprise Console is being upgraded to use passwordless authentication through YubiKeys (device-bound passkey), see Upgrading to Passwordless.
Upgrading to Passwordless
Important
To be able to register a passkey on a YubiKey for passwordless authentication in the Enterprise Console, the YubiKey firmware version must be 5.2.4 or higher (released September 2019). To check the firmware version on the YubiKey you are using, see Verify your YubiKey.
With passwordless authentication, you will only use a password during onboarding of your organization as the first user (Console Owner) logging in for the first time. As soon as you have created a passkey by registering a YubiKey, the password-based credentials are removed. Additional Console users that you add for your organization will activate their account using passwordless login by registering a YubiKey. For more information, see Onboarding.
During the migration of Console users to passwordless authentication, the login process is slightly different for existing and new Console users. The following applies:
- Existing Console users that have not yet upgraded to passwordless authentication will be given the option to move to passwordless when logging in. For a limited time, these users can still log in with their password until a passkey is registered.
- New Console users will log in through passwordless authentication by registering a YubiKey.
- SSO-authenticated users that manage SSO (Single Sign-On) configurations for their organizations will be asked to log out and in again using the username and password (not SSO) that was registered for that specific Console account. Once logged in, the passwordless migration process will begin. SSO-authenticated users that do not manage SSO configurations will not need to migrate to passwordless authentication at this point.
Note
Before upgrading to passwordless authentication, it is recommended to remove any existing synced passkeys associated with your Console account. See Best Practices - Synced Passkeys.
To upgrade to passwordless, do the following:
- Open the Console login page, have your YubiKey ready, click Create Passkey, and follow the instructions. You might be asked to set a PIN for your YubiKey if not already done.
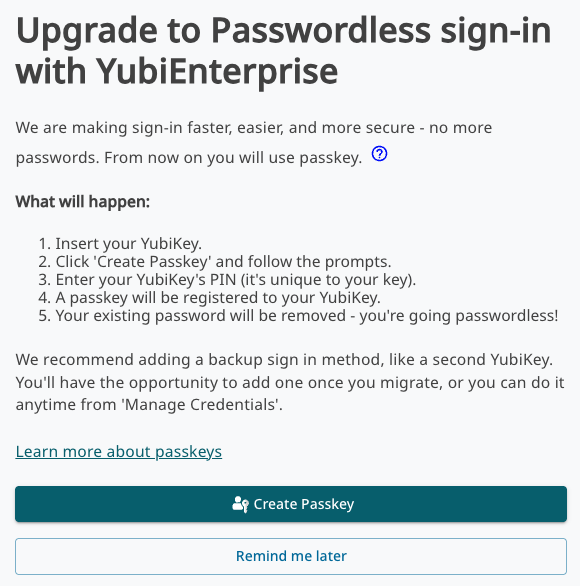
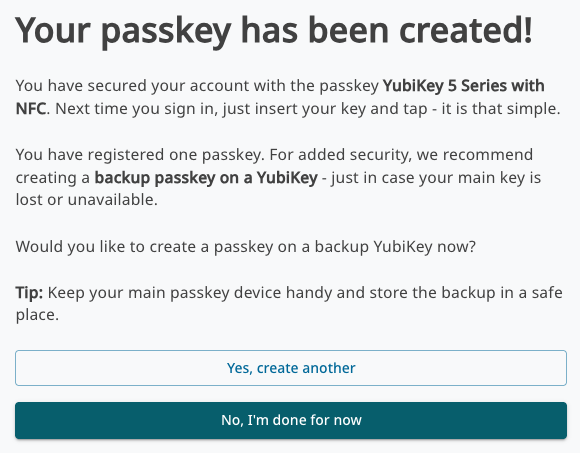
- When the passkey has been registered on your YubiKey, you will be logged out and requested to log in again using your newly registered YubiKey. It is recommended to register an additional YubiKey in case the first one is lost, you can however do this at any time.
- When you have registered a YubiKey, your password-based credentials are removed, and going forward you will use your YubiKey when logging in to the Console.
For more information about passwordless migration, see also Passwordless Migration FAQs.
Removing Synced Passkeys
Before you upgrade to passwordless authentication when logging in to the Console, it is recommended to remove any existing synced passkeys associated with the YubiEnterprise Console login. For more information, see Best Practices - Synced Passkeys.
Lost or Reset YubiKey
If you lose or reset your YubiKey, you can no longer log in to the Console. If this happens, you must contact a Console Owner for your organization to have your account reset as described in Account Resets and Role Changes. You will receive a recovery email with an activation link which you can use to register a new YubiKey and log in to the Console.
Important
It is strongly recommended to register at least two YubiKeys with your Console user account, and keep the spare YubiKey in a safe place. For information on how to register YubiKeys, see Managing Login Credentials.
Account Resets and Role Changes
Note
Only Console Owners can reset user accounts and change user roles. If a user needs to reset their account, they must reach out to a Console Owner in their organization. Yubico cannot reset user accounts if the organization has other Console Owners.
To manage account resets and role changes, do the following:
Click Settings > Users in the left menu.
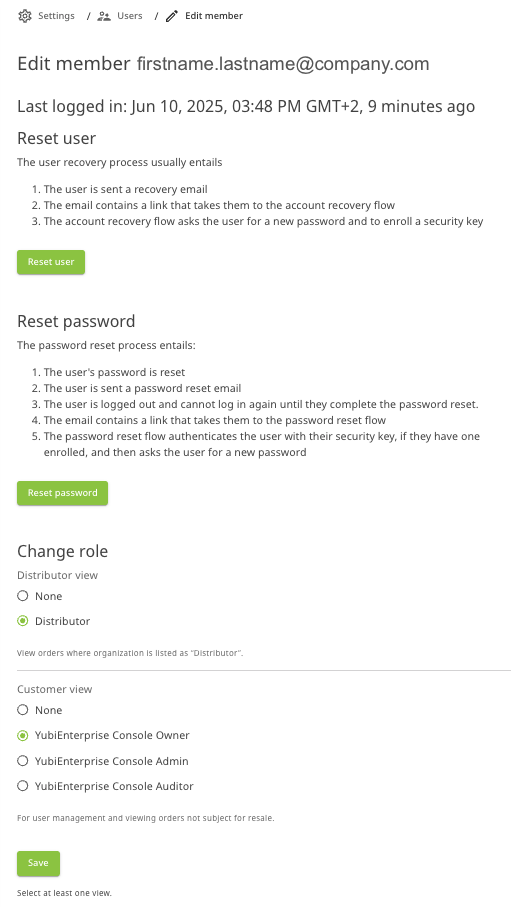
Click the Edit icon on the line for the desired user to open the Edit member page.
Select options as follows:
- To reset the account for a user, click Reset user.
- To reset the password for a user, click Reset password.
Note
The Reset password option is only visible for users that have not yet upgraded to Passwordless Authentication. When a user has been upgraded, the Reset password option is no longer displayed.
- To change the role for a user, select the desired role in the Change role section. If the user is part of a reseller or a distributor organization, the roles that provide access to the distributor/reseller views can also be changed here.
Click Save.
Authenticating with SSO
Single sign-on (SSO) is an authentication method that enables users to use the same set of credentials to securely access multiple applications and services. YubiEnterprise Services supports SSO. For an organization with SSO enabled, users do not have to register.
Although they are added the same way as non-SSO-enabled users, instead of remaining in the Pending state until they follow the emailed instruction to register a security key, they are immediately added to the organization in the Active state. They can therefore use the service-provider-initiated login link to log in to the Console. For more information, see Single Sign-On (SSO).
Note
If your organization is using SSO, the options for managing credentials for logging in to the Console will not be available. Instead, credential management and Console login authentication is done through the SSO provider.
Roles and Permissions
In addition to the Console Owner, Console Admin and Console Auditor roles for Customer (account) organization members, there are also Reseller and Distributor roles. These provide access to specific views for distributors and resellers to view their customers’ purchase orders and inventories.
A Console user can have one or none of the organization member roles, and may have one or both of the Distributor and Reseller roles. All organizations must always have at least one Console Owner, and can have one or more users with the Console Admin or Console Auditor roles.
An organization can for example be both a Customer ordering keys for its own employees, and a Reseller selling keys to end customers. This scenario requires at least one user with the Console Owner role for the organization, and the Reseller role for one or more users in the organization.
The following section describes the different roles and their permissions in more detail.
Customer Roles
The table below describes the permissions for the Console Owner, Console Admin and Console Auditor roles for a Customer (account) organization.
| Permission | Owner | Admin | Auditor |
|---|---|---|---|
| Add/delete organization members | yes | no | no |
| Change member roles | yes | no | no |
| Reset member login credentials | yes | no | no |
| Create/edit shipment requests | yes | yes | no |
| Correct shipping addresses | yes | yes | no |
| View shipments/purchase orders/org settings | yes | yes | yes |
| Manage personal login credentials | yes | yes | yes |
| View other roles’ details | yes | yes | yes |
| Generate API token | yes | yes | no |
| Override address validation | yes | yes | no |
| Download CSV files | yes | no | no |
Console Owners, Admins, and Auditors can all view the names, email addresses and assigned roles of organization members displayed on the Settings > Users page.
Note
Only the end customer can view the Personally Identifiable Information (PII) entered for creating shipment requests. Neither the distributor nor the reseller can view the PII entered by their end customers for creating shipment requests.
In order to view Personally Identifiable Information (PII), new and existing users must accept the applicable terms and conditions when they log in for the first time after the release of YubiEnterprise Services 2.4.0.
Distributor Role
The Distributor role is used by organizations that sell Yubico products to resellers. As a user with the Distributor role, you have access to the Distributor view where you can monitor end customers’ product inventory and activities in your reseller network.
Note
The Distributor role does not provide permission to view or manage user information.
The Distributor view lets you access the Settings > Resellers page where you can provide access for your resellers to view purchase order information.
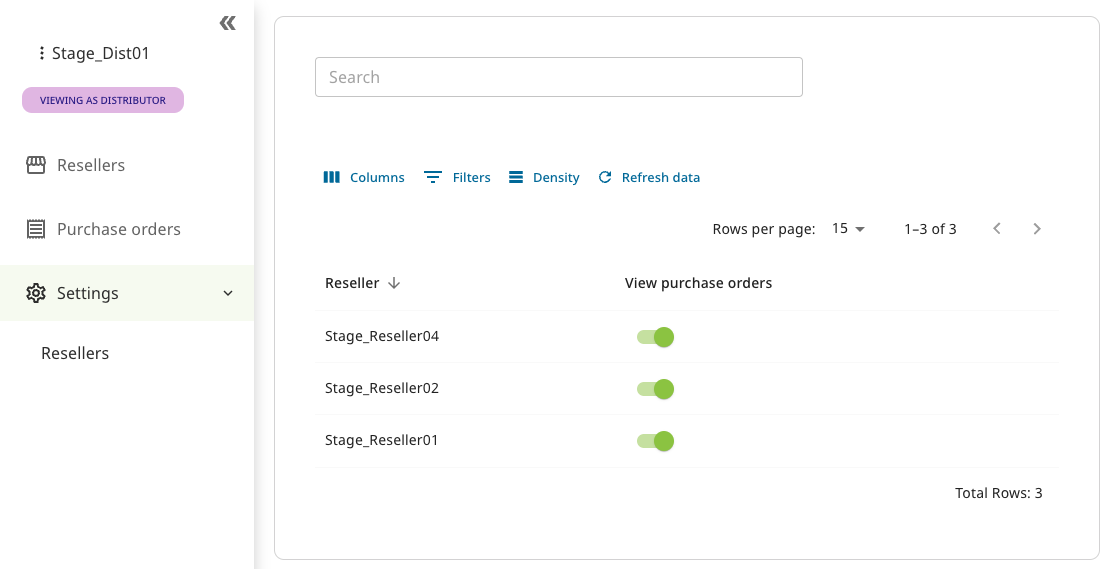
To allow your resellers to access purchase order information for end customers, set the View purchase orders toggle to “on” for the desired reseller. This setting also enables resellers to allow their end customers to access purchase order information. To revoke access to purchase order information, set the toggle to “off”.
Important
If you disable this access for a reseller, then neither that reseller nor their end customers can see any inventory purchased through this reseller.
As a Console Owner for a distributor organization, you can assign the Distributor role to users from your organization. When adding a user as described in Adding or Deleting Users, you will see the option for assigning the Distributor role in the Add new member dialog.
Reseller Role
The Reseller role is used by organizations that sell Yubico products to end customers. As a user with the Reseller role, you have access to the Reseller view where you can monitor end customers’ product inventory and purchase orders.
Note
The Reseller role does not provide permission to view or manage user information.
The Reseller view lets you access the Settings > Customers page where you can provide access for customers to view purchase order information.
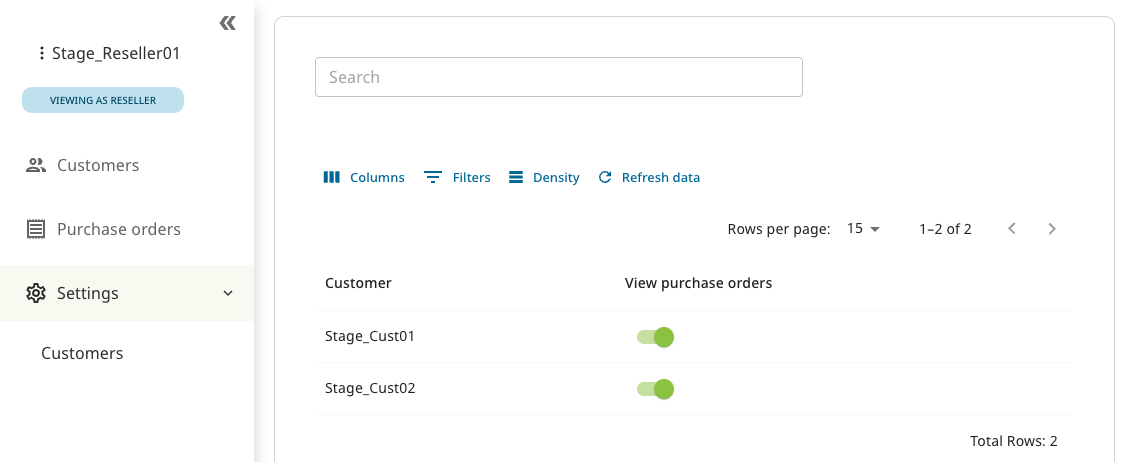
To let a customer access purchase order information, set the View purchase orders toggle to “on” for the desired customer. To revoke access to purchase order information, set the toggle to “off”.
Important
If you disable this access for a customer, this customer will not be able to see any inventory purchased from you. If a distributor is involved, the distributor must also first enable this setting for you as a reseller, in order for your end customer to see the purchase order information.
As a Console Owner for a reseller organization, you can assign the Reseller role to users from your organization. When adding a user as described in Adding or Deleting Users, you will see the option for assigning the Reseller role in the Add new member dialog.
User Account States
All Console users have one of the following account states. To view a user’s account state, click Settings > Users, locate the desired user, and view the State column.
- Active (demo mode)
- This user is the first user added to an organization. The user has activated their account, but they have not yet registered a passkey. Console activity is restricted to the activities described in Procedure Overview.
- Active
- The user has activated their account by logging in to the Console, either through password or by registering a passkey.
- Account Reset
- A Console Owner can do this if a user’s account has been compromised. The user state remains as “Account Reset” until the user follows the instructions in the Account Reset email sent by the system.
- Deactivated
- The user has been removed from all organizations, and they can no longer log in to the Console. All associated access tokens have been revoked. Console Owners can add the user to the organization again at a later date.
- Pending
- The user has been emailed an invitation with an activation link for their Console account, but they have not yet activated their account. This is the initial state for new users.
- Suspended
If a user becomes a security concern, disable system access for that user by contacting Yubico Support to have the user suspended. Any API token the user has is deleted, and their login credentials are temporarily invalidated.
- If a suspended user tries to log in, they get the “userID/password invalid” message.
- Only Yubico can suspend a user and only Yubico can lift such a suspension.
- Although all access tokens are revoked, the user remains associated with their organization, so that if the suspension is lifted, Console Owners are not required to recreate the affected user.
- All owners of the suspended user’s organization receive an email notifying them that this user is suspended and they must contact Yubico Support to have the suspension lifted.